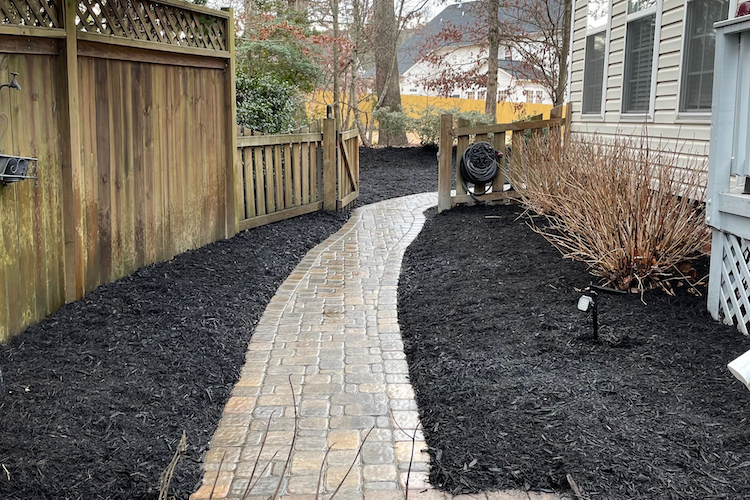
 If you have garden beds on your property, you are likely familiar with the use of mulch in some way or another. A layer of mulch can have several benefits for your soil and plants. These include keeping weeds down, aiding in water retention, and adding an element of visual appeal to your property. Perhaps you have already added mulch to your beds for one of these reasons. If so, you may eventually ask yourself this question: How long will mulch last? The answers can vary depending on the type of mulch, climate, and other factors. That said, it is recommended that homeowners renew the mulch in their beds about once a year.
Factors influencing longevity of mulch As previously mentioned, many factors can come into play when trying to determine how long mulch will last. Let’s examine these: Type- Mulch comes in many varieties, and some last longer than others. Bark mulch will last longer than shredded mulch, as the bark is the tree’s natural protective shell. Shredded mulch contains the inner portions of the tree and will break down more readily. Climate-Your local climate can affect the mulch layer in several ways. An area that experiences frequent heavy rains may present a challenge for keeping the mulch in the bed. This will also be affected by the topography of the bed. On the other hand, an unshaded bed that is constantly baking in the hot sun can require more frequent mulching, as the sun speeds up the natural processes that break down the mulch. Landscaping Practices-Another factor that may play a role in how long mulch will last is the care used in regular bed maintenance. When trimming, weeding, raking, and cleaning up, you will want to leave as much mulch in place as possible. Mulch that ends up with trimmings or weeds in the compost pile is money down the drain. Getting the most out of your mulch How long your mulch will last will come down to the environmental factors at play as well as your own habits in maintaining and protecting your mulch layer. A well-maintained bed with proper watering and landscaping practices will keep your mulch layer in great shape for at least a year. A regular practice of replacing the old mulch each spring will keep your garden beds healthy and beautiful throughout the growing season. This will help keep weeds out and water in. Some may prefer to change the mulch twice a year, using two thin layers of mulch as opposed to one thick layer. This can be a great idea. First, you will be renewing the beauty of the bed in the spring, while adding a fresh weed barrier to endure the growing season. Second, renewing the mulch layer again in the fall can protect your dormant plants from extreme temperatures. This will also help prevent the mulch from breaking down, as there will be newer mulch more often. Last Thoughts When considering how long your mulch will last, many of the influencing factors can be controlled by you. There is no one size fits all answer, but there are ways that you can get the most out of your mulch layer. A great landscaping team can steer you in the right direction, while considering your specific needs.  Pruning a crape myrtle without causing its death is easier said than done. However, with the right insights, your pruning efforts will help your crape myrtle be as healthy and beautiful as possible. This post will share the essential tips you should remember while pruning these lovely trees.
Get the Timing Right Pruning a crape myrtle during the wrong time of year can cause more harm than good, even if your pruning technique is flawless. The ideal time to prune your crape myrtle is late winter or early spring, while the plant remains in a dormant growth phase. During this time, you can remove branches that are dead, damaged, diseased, or crossing one another. Early spring pruning is not always a promising approach for plants that bloom on old wood. However, since crape myrtles bloom on new growth, pruning in early spring does not risk removing the flowers that will bloom later that year. Use the Right Tools and Techniques Don’t prune your crape myrtle, or any other woody plant in your garden, unless your pruning tools are as sharp and sterile as can be. Tools you have cleaned well are less likely to spread disease to your crape myrtle. Likewise, sharp pruning tools make clean cuts that your tree can recover from quickly. Once you have the right tools in hand, the next step is to employ the proper pruning technique. To prune a crape myrtle, you should not shear it, trim it, or top it. Instead, you should remove individual branches selectively, cutting each one at the point where it meets a larger branch. Keep it Light Most novice gardeners tasked with pruning a crape myrtle fear harming this gorgeous plant beyond repair. However, this kind of crape murder usually occurs when you make the mistake of over-pruning your crape myrtle tree. Even if over-pruning is not fatal, it will likely detract from your crape myrtle’s overall form and can cause it to put forth weak new growth that will be prone to breakage. If you want to avoid crape murder, the best approach is to remove one stem or branch at a time using clean cuts. The branches you remove should also be on the smaller side. Generally, any branch that’s thinner than a pencil is safe to remove. Deadhead During Bloom Time Since a crape myrtle’s flowers are its most attractive feature, removing them seems counterintuitive. On the contrary, this pruning style, known as deadheading, can make your tree’s floral more impressive and long-lasting. Any significant structural pruning should take place in early spring. However, you can also remove spent flowers during the bloom period, which may encourage your crape myrtle to produce new blooms. With that said, this pruning style is optional, and some crape myrtle varieties will rebloom without any deadheading at all. Limb Up to Look Good As you may have noticed, the most attractive crape myrtles often have a few graceful main stems that support the canopy. However, that look does not come about on its own. Instead, creating an attractive multi-stemmed look requires strategic pruning. To achieve this look, start by removing all but three to five main stems while your crape myrtle is young. Each spring, remove any branch that emerges from the lower half or lower two-thirds of those main stems. This pruning approach allows your crape myrtle to show off a magnificent form for as long as it graces your garden.
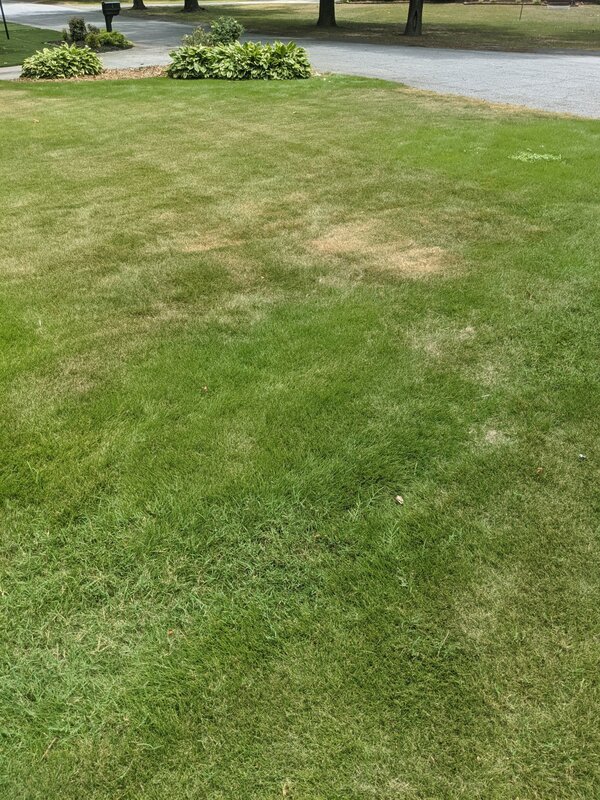
Rain + Summer Heat = The Perfect Combination for Fungus & Disease.
Are you seeing patches of discoloration pop up on your lawn? These could be fungus or disease trying to attack your lawn. Give us a call as soon as you see these patches! The earlier these patches are addressed and treated, the better chance you have of saving your turf. How do you spot these patches? If you are looking at your yard look for any sort of irregularity. Look for areas that are brown, darker than normal or seem to be lower than your other turf. These patches can come on FAST. You may have just seen a perfectly green yard two days before and then all of a sudden today you have patches popping up. Don’t wait before calling for help. The longer the fungus or disease is able to spread, the more damage that will be done. Fungicide needs to be applied as soon as possible to stop the spread. If you notice any irregularity at all, send us an email or give us a call so that we can get your yard back to it’s former glory! By: Hannah Raines Copyright ALL Outdoors 2022 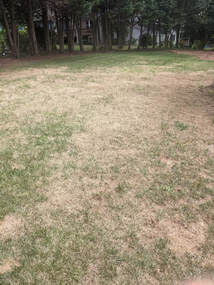 One week's worth of damage from Army Worms. One week's worth of damage from Army Worms. Have you noticed that your lawn looks damaged and a caterpillar looking creature is crawling around? You may have Army Worms! Army Worms tend to strike in late summer until the first frost. These pests thrive in warm temperatures! Once it starts becoming colder, thankfully they will no longer survive. Make sure that you are aware of the signs of Army Worms: Increased bird activity on your lawn. If you’re wondering why you all of a sudden have birds pecking around, it may be because they’re making a snack out of these worms. Discolored sod. It may look similar to how it looks when exposed to frost. Moving Damage. Army Worm damage tends to move from one side of your lawn to the other. This doesn’t always happen like this, but more times than not, this is how you will notice damage. You’ll especially want to keep an eye out from dusk til dawn! Army Worms may not be seen mid-day or early afternoon, which causes homeowners to believe that none of these pesky pests are present. However, damage can happen overnight. Be sure to call us at the first sign of what you believe to be Army Worms. The sooner we can get to you, the less damage they can do and the more likely your lawn is to recover. Give us a call at (864) 275-2039! By: Hannah Raines Copyright ALL Outdoors 2022  Deciding what type of home to buy as your first home can be challenging. When thinking long term, you may wonder whether you want to start out in a smaller home and upgrade later in life, or start out in your forever home. No matter your situation, you'll want to take financial considerations, life goals, and many other things into account before making this important decision.
Benefits of a Starter Home A starter home can mean different things to different people, but it is generally a home that you intend to live in only for a few years. Starter homes are often more affordable and require less upkeep, but at the cost of potentially needing more repairs. Buying a smaller home is a great way to help you navigate the challenges of being a first-time homeowner, especially if you have been renting beforehand. How to Know if a Starter Home Is Right for You There are many reasons that you may decide on buying a starter home depending on your life situation. Financially, buying a starter home can be the right call if you cannot afford the larger payments of your dream home. Starter homes can also allow you to build equity, giving you more financial resources to put toward your future forever home. If you are just starting out in your career and family life, then buying a starter home may be a natural first step. Benefits of a Forever Home A forever home may suit your needs better if you're ready to settle down and grow your family. A forever home will likely be larger and make for an excellent investment, but at the cost of higher upkeep and payments. Still, the advantages of a forever home may be enough to justify the higher costs for you if you are ready to settle into one location with your family. Reasons a Forever Home Can Wait If you are aiming to buy a forever home, you'll want to be sure it suits your needs perfectly. Finding a home in a good location with all the amenities and space you desire can be a tricky thing, and you won't want to settle for a home that meets only some of these criteria. If you can't find your perfect dream home now, it may be wise to wait for other options to open up. Insuring Your Home No matter what type of home you decide to buy, insurance is important. Is a home warranty worth it? A home warranty can cover any broken home systems or appliances for around $300-$600 per year. Before you decide whether a home warranty is right for you, check your home inspection report for red flags as well as any existing warranties on certain appliances within your home. Finding the Right Home for You Finding the perfect home comes down to understanding your own situation and what you want both now and in the future. Once you find the home you'll be staying in, one of the ways you may customize it is through landscaping and lawn care. For homeowners in the Greer, SC area, consider hiring professionals at All Outdoors to create your ideal yard.rd. Landscaping Your Starter or Forever Home No matter whether you are in a starter or a forever home, you will want to make it beautifully your own. ALL Outdoors is always happy to help with this. Forever homes may include upgrades such as outdoor patios or fire pits, while starter homes may be smaller additions such as shrubs or a perfectly planted tree. Either way, landscaping adds value to your home! Thank you to guest blogger, Tina Martin from ideaspired.com for submitting this article to us!  While there are many small-scale and cosmetic do-it-yourself projects that can improve the look and feel of your home, when it comes to large-scale renovations, it's important to hire a professional to do the work on your behalf. Hiring a pro ensures that everything is done correctly, is up to code, and that you're keeping yourself out of harm’s way – an especially important factor when using specialized tools or machinery. You’ll also want to keep in mind how projects can potentially increase the price of your home, and plan accordingly. Let’s take a look into projects you can tackle yourself.
What Can You DIY? If you’re handy and comfortable with basic home repair, you can easily tackle projects like making a paver stone pathway, hanging new light fixtures in bathrooms, or adding a fresh coat of paint. In fact, several projects like these are worth considering if you plan to sell your home anytime soon. Exploring online tutorials and demos in home improvement centers can give you some practical tips and knowledge. You can even rent some types of equipment to make the process easier. Keep in mind, improvements should add to your appraised value, not detract. For example installing a shoddy patio cover or privacy fence that later has to be removed to pass a home inspection is a waste of your time, money, and energy. Why Hire A Professional? Many professionals make home-improvement projects look easy, but that's often because they've become so good at their craft that it seems to be second nature. Keep in mind that contracting professionals typically have years of experience, including apprenticeships. They’re familiar with the latest tools, technology, and materials, and are licensed, bonded, and insured in the event something goes awry during the course of your project. They’re the ones to call for things like window replacement, room additions, and flooring installation. Before hiring anybody, ask for references and get written quotes from several different companies. Upgrades That Add Curb Appeal If you’re making improvements in an effort to sell your home for top dollar, simple changes can be cost-efficient, as well as effective. As Moving.com notes, an outside makeover can make your home a standout. Power wash your home’s exterior, plant new flowers, add a splash of color to your door, and install landscape lighting to showcase it all. Not only does this add a touch of flair to your listing, you’re also more likely to attract drive-by interest if you set your home apart from others in the neighborhood. Some homeowner associations place limits on outdoor modifications, so check yours in advance. When you’re ready to upgrade your outdoor property and beautify your lawn, count on the team at All Outdoors for expert lawn care and landscaping services and patio and outdoor kitchen installation. Improvements That Add Value While you naturally want your home improvement projects to make your house more enjoyable for you and your family, it's also wise to keep in mind which projects will add substantial value to your home, versus those that will not. For example, kitchen and bathroom renovations typically add to your home’s appraised value, whereas projects like swimming pools don't always provide the same return on investment. Paying for Upgrades and Tracking Your Expenses Whether you make your own improvements or hire a professional, home improvements can get pricey. If you need some extra funds to pay for upgrades, consider refinancing your home and using the cash sum you receive for home improvement projects. If you have an existing FHA mortgage, an FHA streamline refinance has more forgiving income and appraisal requirements than traditional refinancing. Keep records and receipts, as well as take before-and-after photographs. This can help you demonstrate the work and investment you've made on the property when it comes time to appraise or sell. It can also help you offset capital gains taxes if you're selling a property after only having lived in it for a short period of time. If you’re fixing up a property to use as a rental, track expenses there as well, as they’re likely to be tax deductible. Per HGTV, many DIY projects are enjoyable and are easy to do on a weekend, without a great deal of time or expense. Hiring a professional for bigger projects may cost more than doing it on your own, but keep in mind, contractors with crews can work quickly and efficiently, reducing the amount of time your home is in disarray. Determine what your priorities are, and then get busy! By: Clara Beaufort Clara is a retired business owner, who currently works in community gardening. She operates GardenerGigs, which aims to connect local gardeners with those who need them.  Concrete patios can last for decades. Homeowners may choose them for their lower cost and easy maintenance cleaning. However, there are several issues that can occur. Let’s break them down.
Cracking This is probably the most common issue that arises with concrete. It can crack for several different reasons. Cracks can be caused by settling in the sub level, heavy loads, contraction due to change in temperatures or improperly laid concrete. Surface Scaling (can also be referred to as spalling) Scaling happens when a thin layer of the concrete’s surface begins to flake or “scales.” This could be cause by freezing temperatures, unsuitable concrete mix, excessive use of chemicals and/or poor finishing. Discoloration While this may not be a huge deal breaker since discoloration isn’t a structural issue, it can still be an issue in it’s own right. Regular wear & tear and exposure to the elements can cause an unattractive discoloration. Blisters Concrete blisters are small bumps on the surface. They are caused by air trapped beneath the sealant. Again, this isn’t quite a serious structural issue, but can be unappealing to the eye. If you have questions about concrete patios or other patio options, we are always here to help! Give us a call at (864) 275-2039! By: Hannah Raines Copyright ALL Outdoors 2022  Spring is right around the corner! Are you and your lawn ready? Here are a few tips on how you can get your lawn in shape before spring arrives!
Prepare the soil- Late winter is a great time to prepare your flower and garden beds. Soil can become compacted during the winter months, so the first thing that should be done is to loosen the soil by tilling. This is also a good time to mix in compost or mulch. This is also a great time to test the pH and determine whether it is in a good spot for what you are planning to plant. Level Your Lawn- The biggest reason why you may need to level your lawn is because you have a drainage issue. This is a task that can be done during winter. You can level your lawn by adding a layer of topsoil. Adding topsoil improves the soil’s health, structure and the capacity in which it holds water. Look for Standing Water- Standing water is harmful in more ways than one. It can be harmful to your lawn because grass can’t handle being underwater. It can completely damage your lawn’s root structure. If the standing water gets really bad, it could even damage your home’s foundation. It’s important to get to the root of the problem and create a drainage system before it causes damage! Clean Out- Late winter & early spring is a great time to clean out your flower beds and gardens. Get rid of any weeds that have popped up, any dead plants and remove any debris! This will give you a nice clean slate to beginning planting for spring! Prune- Late winter & early spring is also the perfect time to prune because you can see the branch structure well and you can shape the plant before the buds break dormancy and the plant starts investing energy in its branches. However, make sure to do some research to make sure that the plant doesn’t bloom on old wood. Several plants bloom on old wood and shouldn’t be pruned until after blooming such as Camellia, Rhododendron, Forsythia, Hydrangea, Lilac, Magnolia, and Mountain Laurel. We are always here to help! Give us a call at (864) 275-2039! By: Hannah Raines Copyright ALL Outdoors 2022 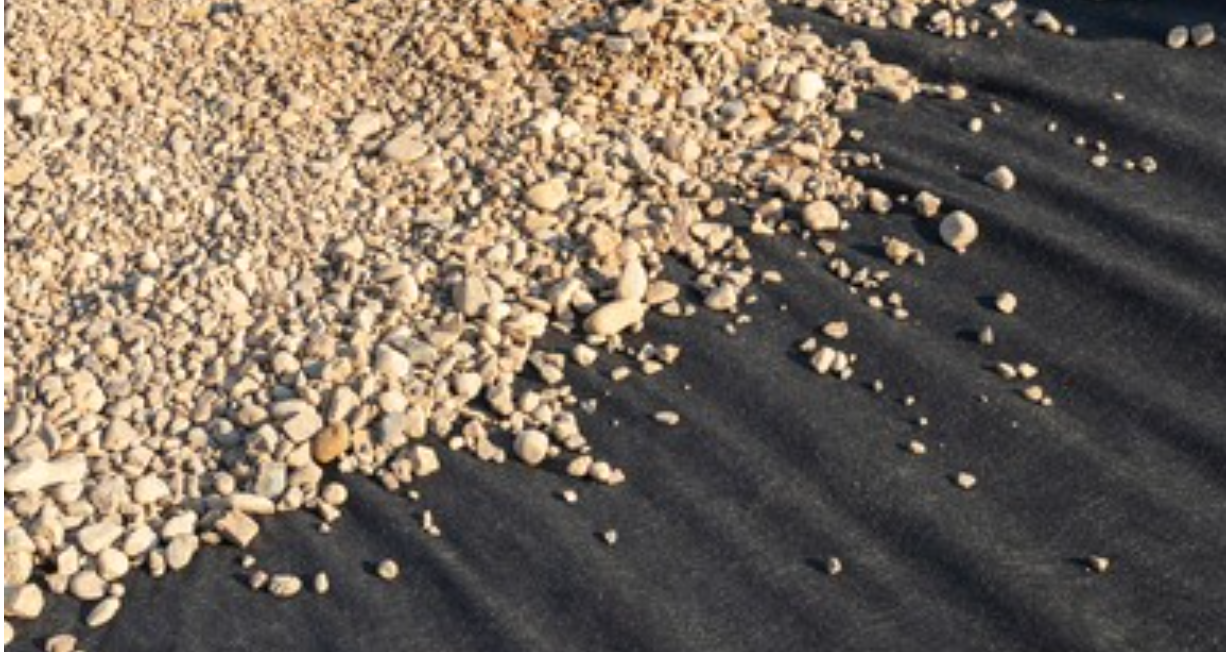 The quick answer is no! Landscape fabric should only be used in certain situations. The cons of landscape fabric outweighs the pros which is why for most cases we do not recommend the use of landscape fabric under mulch.
First of all, you might be wondering, what is landscape fabric? Landscape fabric can be found at your local lawn & garden store in rolls that are at least 3 feet wide and up to 200 feet long. The fabric is made either as a solid sheet with holes or woven fibers. The purpose of landscape fabric is to create a barrier between the soil and mulch and prevents weeds. It is also used to retain moisture. Sounds great, right? Ultimately, landscape fabric ends up causing more harm than good. Landscape fabric retains moisture, which sounds great, but it actually encourages poor drainage and creates a perfect environment for mold & other disease to thrive. The barrier can cause earthworms to die. Earthworms aerate & keep soil healthy, but when they are unable to reach the surface for air to survive, they die & that causes the soil under the fabric to become unhealthy. Also, because of the barrier, the nutrients from mulch, pine needles & leaves are unable to reach the soil below. Weeds can also still grow. Instead of growing to the surface, they root onto the landscape fabric. Also, a big con of landscape fabric is how hard it is to remove. Especially if it has been there for a long amount of time and weeds have rooted to the fabric. Because it isn’t made from an organic material, it will never decompose so it will need to be physically removed. However, there are two instances where we do approve of the use of landscape fabric. River Rocks & Septic Tanks. While the fabric should never be placed OVER your septic system, it can be placed AROUND your septic system. If you cover over, it could reduce air exchange & cause retention of excess moisture. The other exception is when laying river rocks. Weeds are less likely to grow in rocks and the landscape fabric provides a barrier. However, if you’re planting anything amongst the rocks, make sure to leave plenty of space around the plants landscape fabric free so that nutrients & earthworms can still reach the soil! If you have any questions, we are always happy to help! Give us a call at (864) 275-2039! By: Hannah Raines Copyright ALL Outdoors 2022 When you look at homes across the South, you’ll see a common theme, from large homes to quaint little homes—all have a front porch. Many people are moving to Greenville, SC as well as other southern states and modern remodeled homes are making their appearance while the more traditional make an exit. With this design and the team at ALL Outdoors Landscaping, a modern front porch patio design that still brings accents of the traditional elements, gives a fresh, new modern approach to southern charm was created. Front porches have long been a staple, or have at least been known as a prime architecturally feature seen in many eras. From the 1800s to present day, porches have been showing off the skills of builders and millworking. They have even been found in classical Greek architecture with large verandas with columns and stone porches (Old House). This simple, yet charming, feature adds shelter from the rain, an inviting entrance, a place to entertain and simply a place to rest. Front porch living is as charming as it comes. Adding a modern approach to a southern front porch is what I will show you in this design, as well as how to bring the same charming feel to a modern design.
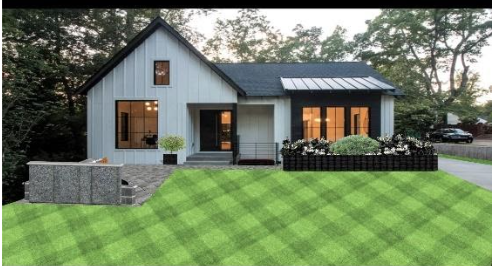
Instead of using wood that decays or adding a roof, I chose to use Techo-Bloc Blue stone in the design to bring out the cool tones in the concrete driveway and wall. The patio porch is larger on the left side to enlarge the yard with the installation a Techo-Bloc Graphix wall. This features two tones of nickel gray and onyx black to accent the home. The 18 Ft. Graphix wall has built-in drainage. The wall also wraps to the front-facing wall where you’ll find a fireplace that I custom designed with a Warming Trends custom burner. (ps. A later blog will reveal the full project transformation with fireplace, lighting and all elements finished…Stay Tuned). The patio porch extends in both directions and is large on the left side behind the fireplace. Then, extends in front of the home to the driveway. To give the appearance of a front porch, a 7 foot wide and 30 inch tall planter box will be installed in front of the patio, centered with the windows on the front right of the home. The planter box is custom and is treated to mimic Core tin metal. There will be a powder coated horizontal slated fence front plate that will be placed 3 inches in front of the planter and back lit. The address will also be laser cut in the front plate and lit up as well. This will be installed as one of the last elements in the design. To add a little more charm, a teak bench will be installed, along with Luxor Colored lighting, new synthetic turf from Landscapers Supply in Greenville and Techo-Bloc paver apron for the end of the driveway. To top it off, new low maintenance plants will be installed. Stay tuned to my blog for the reveal of the full project! 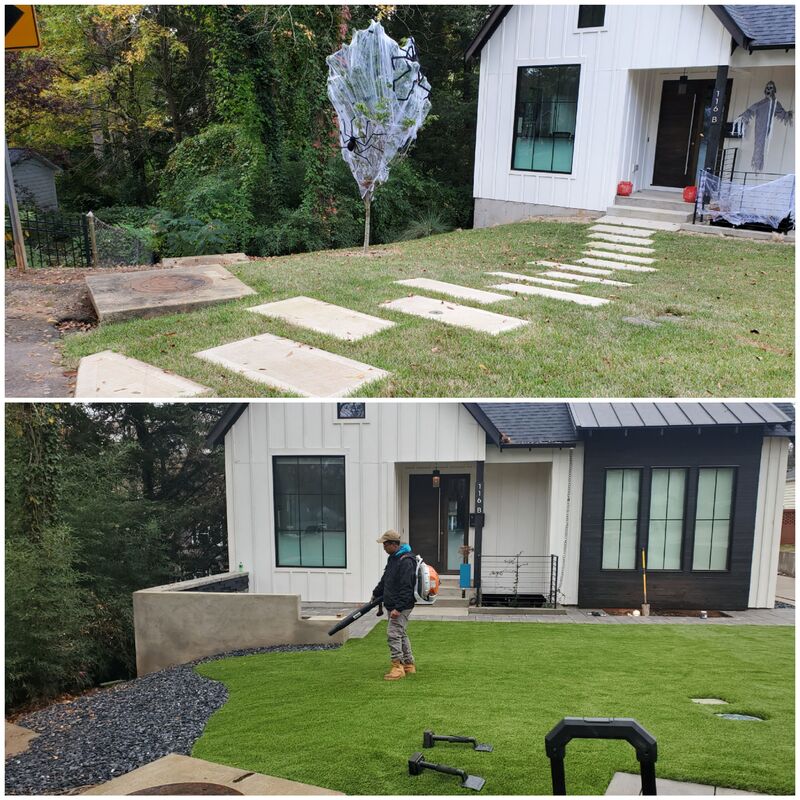 *1.3: This is the Before and Progress Photo: (exceptions: plants and core tin planter box missing)
By: Danielle Collins Copyright ALL Outdoors 2022 Works cited: |
�
Categories
All
AuthorALL Outdoors will post educational articles, videos, and newsletters to help you learn about the lawn care, landscaping, and outdoor living world. Click Below to Follow Us on Facebook, Twitter, and Youtube. All Blogs are posted on our page as well.
Click Below to Receive Email Notification when a New Blog is Posted.
To Use the RSS Feed you must have a RSS Feed Reader App. The URL is www.alloutdoors-sc.com/1/feed
|
|
Service Area:
We proudly service Greenville, Greer, Taylors, Mauldin, Simpsonville, Five Forks, and surrounding Upstate cities in South Carolina for lawn care and landscaping services. Call us today at 864.275.2039 to see why we are the premier lawn and landscape company of the Upstate. |
Navigation
Request a Quote
Residential Services - Commercial Services FAQ - Testimonials - Career Home - About Us - Gallery - Client Login Terms of Service - Warranties |
Contact Information:

|


 RSS Feed